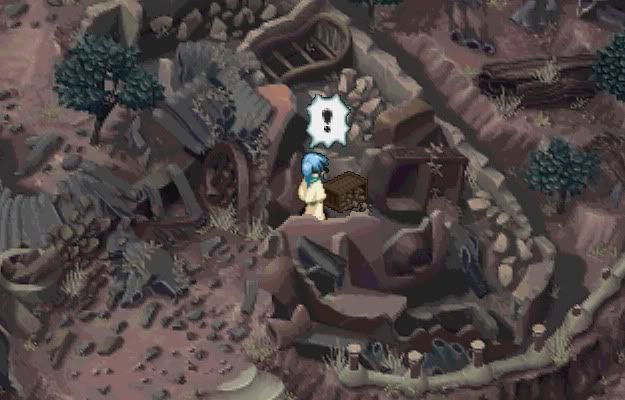
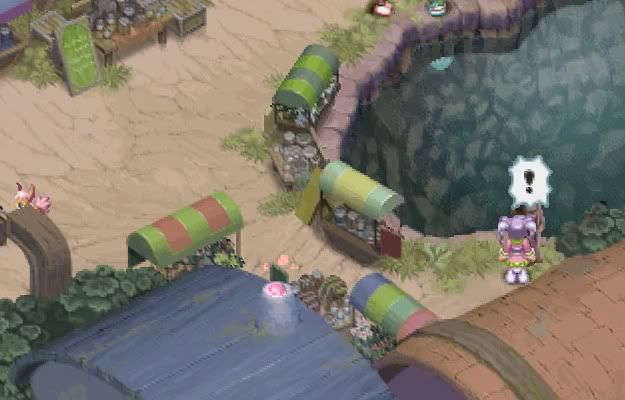
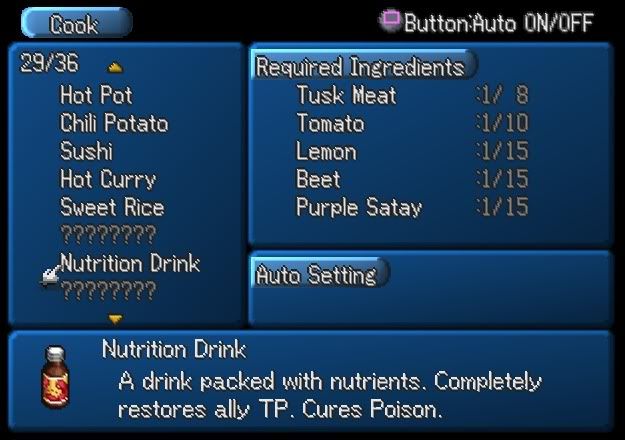
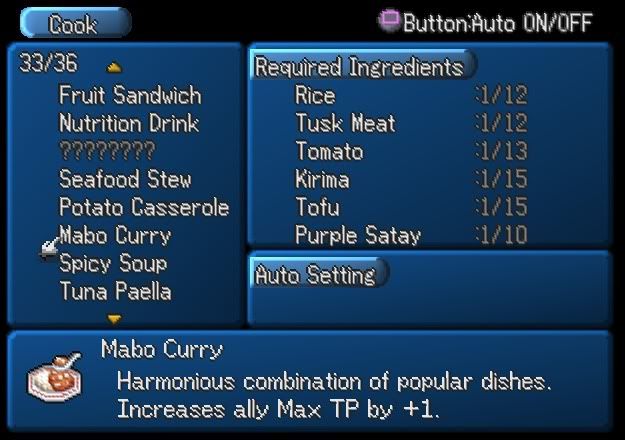
****************************************************************** [------------------------] IMEN [------------------------] Items: Lens x2, Melange Gel x2, Orange Gel, Recipe x2, Striped Ribbon========================================================== Enemies: (Overworld) Beet Beast, Flying Soul, Grasshopper, Heavy Snake, Night Flyer, Rapid Rabbit, River Sickle, Purse Beetle Bosses: None ****************************************************************** You will start off in a barren area, so go to the upper right hand corner above the stairs to get a LENS. Get the MELANGE GEL from the chest in the house at the bottom, now exit here and go, southeast to get to Imen. When you enter, Meredy will be very happy to be home. A scene will happen and you will be in Meredy's house. The guy above her house sells food, but the jar next to him holds a MELANGE GEL, so be sure to get it. Go down to the next screen and search the basket near the house to the right to get an ORANGE GEL, then go to the house below to have a scene where Meredy talks to some old friends. Buy some items here. Now, go outside and enter again and talk to the guy near the entrance. Exit the store and go up to the next screen, and go to the building above. Sagura will explain about the weapons, and Keele and Reid will join in on the conversation. Keele will want to go to the library, and Reid will want to sleep, so you will be switched over to a scene in Meredy's house. When you are done with the scene and have control of Reid, go outside of the bedroom and get a LENS from the table, then enter the door above the stairs. Keele ddn't come home, so it's time to find him. Check the jar to the right of the eastern most bed to get a STRIPED RIBBON, then go outside the bedroom and search the robot to get the SWEET RICE RECIPE from the Wonder Chef. Farah will want to accompany you, so now go to the library, which is one screen up and one screen to the left, in the middle portion of the left hand side. Keele will have learned a bunch of stuff, and when you gain control, go back to the library and get the FRUIT COCKTAIL RECIPE from the Wonder Chef in the white book at the upper left hand corner. Go inside Meredy's house, and watch the scene. Now, head off to Imen Station, which is directly east of Imen. ****************************************************************** [------------------------] IMEN STATION [------------------------] Items: None========================================================== Enemies: None Bosses: None ****************************************************************** When you get here, you will sadly discover that you cannot board the train, but Meredy will reveal that she is a helper for Galenos. Go back to Imen, and go to the shop where Sagura is. Check the train cage and buy it for 2,000 Gald, then go back to Imen Station and get inside the train. The train will start working! Now, you have to play a pretty fun mini game. /---------/ MINI GAME /--------------------------/ CRAYMEL EXPRESS / CONTROLS: Up - Brake Level Up Down - Brake Level Down ------------------------------------------------------------------------------- -I liked this mini game. You are in control of the Craymel Express, and you have to stop at each Station to deliver mail. Watch the Brake Power level, as you go faster, the Brake Power gets lower and lower, and once it gets to zero, the brakes won't work any more. But you can't use the brakes too much, either. Increase the brake level as you get closer to a station and you should do fine. /------------------------------------------------------------------------------/ Now, you will have arrived in Luishka Station! ****************************************************************** [------------------------] LUISHKA STATION [------------------------] Items: None========================================================== Enemies: (Overworld) Grasshoper, Heavy Snake, Night Flyer, Purse Beetle, Reptile, River Sickle Bosses: None ****************************************************************** Just go out of here and east to Luishka. What, you thought it was gonna be some complicated walkthrough? I don't get paid by the hour, you know. =P ****************************************************************** [------------------------] LUISKHA [------------------------] Items: None========================================================== Enemies: None Bosses: None ****************************************************************** Here, the party will discovered that this is indeed the ruined city, as a big explosion happened apparently. Go up two screens and enter the mansion. Go right two screens and you will see Galenos. You will get a scene where Galenos describes with Fibrill is. Go ypstairs and enter the bedroom and search the green plant near the bed to get the BITTER TOFU RECIPE from the Wonder Chef. Go downstairs and go back to where you met Galenos. A long scene will occur where Reid is being examined by Galenos. After the scene, go outside the mansion and go left to the next screen. St the house, check the wooden box to get the HOT BORSCH RECIPE from the Wonder Chef. Now, go back to Luishka Station. Talk to the train staff and choose to go to the Abandoned Mine Station. Another fun mini game will occur. /---------/ MINI GAME /--------------------------/ CRAYMEL EXPRESS / CONTROLS: X - Press to start countdown, release to throw. ---------------------------------------------------------------------------- ENEMIES: Flying Soul, Hard Horn ---------------------------------------------------------------------------- -I liked this mini game. You have to throw Craymel Bombs at the enemies. You can also battle any enemies that come close to you, and that's what I did, as extra experience points never hurt, and they give some good experience. Anyways, just throw bombs at enemies and make sure the countdown of the bomb is at zero when it hits the enemy. If you don't want easy experience, that is. =) /------------------------------------------------------------------------------/ ****************************************************************** [------------------------] MINE OF GNOME [------------------------] Items: All-Divide, Bear Claw, Bellebane, Elixir, Gnome Pick, Gold Bracelet, Hourglass, Lemon Gel, Miracle Gel, Mythril Circlet, Ogre Lance, Pine Gel, Rabbit's Foot, Red Shield, Ruby Wand, Rune Bottle, Savory========================================================== Enemies: Blood Sucker, Fungusnail, Gentallman, Hard Horn, Living Sword, Night Flyer, River Sickle, Roller Snail, Sliver, Tetratusk Bosses: None ****************************************************************** The chest holds a GOLD BRACELET, so pick it up, and then enter the Mine of Gnome. Enter the door and rest here, then take the Dynamite from the locker. Go right, get the SAVORY from the chest, then use the Dynamite you got from the locker to blow the boulder away, clearing a path for you. Go back to the room you rested in and get the Shovel from the locker. Go back to where you blew the boulder and pull the lever and take the HOURGLASS from the treasure chest. There is a RUBY WAND in the upper left hand corner, as well. Go down to the next screen. Here, get the BELLEBANE and MIRACLE GEL in the upper left hand corner, then get the RUNE BOTTLE in the upper right hand corner. Go down to the next screen. Grab the ELIXIR from the chest in the upper left hand side, then go down and left to get to the next screen. Get the PINE GEL from the chest, then go down a little, then east. Use the shovel on the pile, then go up to the next screen, and go right. Go up, pull the lever, and get the ALL-DIVIDE from the chest. Then clear the pile using the shovel. Go back to the room you rested in and get the Dynamite again. Go back to where you cleared the debris just now and go down to the next screen to get a RED SHIELD, then go south to the next screen again. Use the Dynamite on the boulder, and get the LEMON GEL from the chest. Go back to the Miner's Room and get the Key, then come all the way back here and use the Key on the machine to go underground. Here, the party will rest, and a new mini game will begin. /---------/ MINI GAME /--------------------------/ WHIS CARD GAME / CONTROLS: Left/Right - Select a Card X - Put down a card Circle - Pass Triangle - End ---------------------------------------------------------------------------- I am not a real big fan of this card game, as it's a lot less fun than the superior Tetra Master card game found in FF9. You play the cards with matching elements, and the first one to use up all their cards wins. However, if you have more than 15 cards in your hand, you lose. After five rounds, whoever has the highest score is the winner. You can skip a turn, and you have to fight elements with the same element, so if someone puts down a fire card, you should use a fire card as well. Also, if you use an attack card, the next person will be forced to gain two cards, which is an advantage for you, but beware, as the opponents can do the same to you. One more thing, you can use Double and Ice to fight Fire, Prism and Volt to fight Water, Change and Earth to fight Wind, and Light and Dark are optional cards. /------------------------------------------------------------------------------/ You will now get the valuable item VHIS. Go down through the hidden path to collect a GNOME PICK, then go down to the next screen, getting the BEAR CLAW along the way. The chests here host an OGRE LANCE and MYTHRIL CIRCLET. Go back to the room you came from and go right, then go to the upper right and pull the lever to get the Dynamite. Go down, then right, and blow the boulder up. Get the RABBIT'S FOOT and go down to the next screen. A scene will ensue with a Gnome, and then you will be in Gnome's Village. ****************************************************************** [-----------------------] GNOME VILLAGE [-----------------------] Items: Lens========================================================== Enemies: None Bosses: Gnome ****************************************************************** The lower left corner has a LENS, and talk to the Gnomes to buy food, buy items, and rest. Go to the right and you will have to face the Greater Earth Craymel. ========================================================== ------------------------/BOSS FIGHT!/-----------/ GNOME /---------- HP: 16,100 ATTACKS: Grave, King Tackle, Snout Flare, Summon Friends, Ultra Grave REWARDS: Moon Crystal, Rune Bottle ---------------------------------------------------------------------------- Wind spells work well on Gnome, as I guess wind beats earth.. or something. Well, anyways, fire away with wind spills and beware of his attacks, especially Summon Friends, which does quite a decent amount of damage to your entire party. Reid and Farah should pound away with attacks, Meredy can do wind attacks, while Keele should be the healer here. He's really not all that tough. ========================================================== You now have the Gnome Craymel in your Craymel Cage. Go back to the room before Gnome's Village, then go to the hole and you will be outside. ****************************************************************** [-----------------------] THE HUT OF DOOM [-----------------------] Items: 4000 Gald, All-Divide, Bloody Robe, Blue Talisman, Emerald Ring, Lemon Gel, Melange Gel, Mythril Helm, Panacea Bottle, Pine Gel x3, Soul Eater,========================================================== Enemies: (Overworld) Grasshopper, Heavy Snake, Night Flyer, Purse Beetle, Repitle, River Sickle (Van Eltia) Criminal, Culprit, Dark Servant, Living Sword, Murder Bosses: Guardian ****************************************************************** Go into the hut, then enter the door below, and you will be tricked and put to sleep with sleeping gas, and when you wake up, you will be somewhere else. Enter the room and searh the clock for the HONEY RAMEN RECIPE from the Wonder Chef. Check the Mask and you can buy some items if you need them. Go outside of the room and go upstairs to get to Basement Level 8. Go to the door to the right and enter the door all the way down, then get the PINE GEL from the chest. Take the Yellow Toy Duck from the middle of the room. Go outside of the room, then go down and take the door to the above room. Follow the path until you get to the room with 5 light bulbs and 4 doors, and light all the light bulbs to red/blue until an arrow points to the door on the right, then enter the door. Get the PANACEA BOTTLE, then go back and make the arrow face the left door, then enter it. Get the windup key from the upper left hand side of this room. Go back to where the hole is that Quickie couldn't get through, and search the hole. The toy duck will move inside of the hole. Enter the door above and go upstairs to Basement Level 7. Go to the door on the right and go all the way down to the last room. Get the MYTHRIL HELM rom the chest, then go to the previous room and enter the door on the upper right hand side to get the GHOST SHELL, then enter the door to the left. Enter the door to the left, then go south to thenext room. Get the Toy Duck. Enter the middle door and enter the door above, then follow the path to get the Spring. Go back to the room with the hole, and search the hole so the duck will go through it again. Go up to Basement Level 6. Go through the left hand side door and then go to the upper right and enter that door. Search the item near the entrance and Keele will get mad at you. Exit this room, then go through the door to the left. There's a fake door containing an enemy on the right hand side, so look at the wallpaper above, then press R1 and you will see the door. Get the BLOODY ROBE and the Toy Duck here. Go back to the room with the hole, then press R1 in front of the right hand side door. Enter the door near the entrance. Use R1 above the fake door, and you will get a spring inside. Go back to the room with the hole and use the duck. Go to Basement Level 5 now. Enter the door to the right and go to the furthest right door. Go down to the question mark flood and choose the "A Map" answer to get the LEMON GEL, now go back to the room with the hole. Go through the left door, then enter the upper right corner and choose "A joke" answer to get the spring. Go to the left and choose the "Fog" answer to get the MELANGE GEL, then go to the left. Choose the "A mop" answer to get the PINE GEL, then exit this room and go down to the southern most room. Enter the door all the way to the left, and choose the "A sweater" answer to get the toy duck. Go back to the room with the hole and use the duck. You are now on Basement Level 4. You're getting there! Enter the door to the right and go to the eastern most door. Check the wardrobe to get the spring, and go back to the room with the hole. Go to the left side oor, and enter the western most door, and check the box for a LENS, then enter the upper left corner to get the toy duck. You know what to do by now. I hope. =) You are now on Basement Level 3. Enter the door to the left and enter the upper right hand corner to get the spring, then go left. Collect the PINE GEL and BLUE TALISMAN, then go left and put the statue on the switch. Go south, and exit this room. Put the statue in the middle of the belt and go to the room to the left, then grab the toy duck. Put it in the hole, blah blah. You are now in Basement Level 2. Enter the door to the right, then all the way to the right, and enter te door to get the Toy Duck, then make sure the picture is facing directly left. Go back to the previous room and enter the door above, and follow the path to the picture. Make sure it's facing down, then go left and get the EMERALD RING. Go back to the room with the hole and go left, then enter the furthest door to the west, and get the spring. Make sure the picture is facing right, and use the toy duck in the hole. You are now in Basement Level 1. Enter the door to the right and go to the furthest east door and go through it. Get the Toy Duck after moving the barrels out of the way. The crate above the vegetable crate hosts a LENS, so make sure to pick it up. Go back to the room with the hole, and go all the way left to the last door, and get 4000 Gald, then go south and enter the furthest left door. Return all the books to the shelves and the door will open. Get the spring, and then use the duck, but a boss will attack you as you try to leave! ========================================================== ------------------------/BOSS FIGHT!/-----------/ GUARDIAN /------ HP: 30,000 ATTACKS: Lightning REWARDS: Rune Bottle, Pine Gel ---------------------------------------------------------------------------- He's strong against Lightning, so make sure not to use any Lightning based spells. Despite his strong reaction to Lightning, he is quite easy, as regular skill attacks work well, and he's weak against Wind, Fire, and Ice. I wouldn't reccomend using any attack magic on him, however, as skills work just as well, if not better, and he goes very fast, so you'd want to make sure you continue to hit him so he can't pull off his Lightning attack as much. Just designate a healer and you'll be fine. ========================================================== Enter the door and you will be in the Hut again. A person will come in, named Chat, who said he tested you. So of course, she'll join your party. By the way, in case you were wondering, this is a direct ripoff of Final Fantasy 5's "woman pirate" character, but at least she reveals right away her gender, unlike Faris. Once you are in the Van Elita and have control, check the big engine for a LENS, then talk to Chat to depart. You will end up in Peruti. ****************************************************************** [------------------------] PERUTI [------------------------] Items: Apple Gel========================================================== Enemies: None Bosses: None ****************************************************************** Go left and go into the house. Check the stove to get the SPICY SHRIMP RECIPE from the Wonder Chef. Go out of here, and go left to the first house from the entrance. A guy around here will tell you about an Ice Craymel. Buy some items, and cgecj the snowman in the second house from the left, second floor, to get the SUSHI RECIPE from the Wonder Chef. Go outside, and go west to the next screen. Go into the Mountain Gear Shop, and watch the funny scene, then you will have to choose what items should be given to whom. Choose Poncho for Farah, Cape for Meredy, and Heavy Cloak for Keele. It took me a long time to figure that out. =) Go outside the town and head northwest to get to Mt. Celsius. ****************************************************************** [------------------------] MT. CELSIUS [------------------------] Items: All-Divide, Aqua Cape, Battle Pick, Elixir x2, Freeze Charm, Freeze Ring, Hourglass, Lavender, Miracle Gel, Rune Bottle, Syrup Bottle x3========================================================== Enemies: Bigfoot, Dark Servant, Flying Soul, Gallows Bird, Hunchback, Ice Tiger, Ice Warrior, Snow Lobster, Terror Bosses: Celsius ****************************************************************** When you enter, Efreet will use his powers to shoot flames everywhere so you can easily manuever through here. Go up to the next screen, then get the ELIXIR and AQUA CAPE from the chests. Go upstairs, then up to the next area and follow the path to get the RUNE BOTTLE, then go back two screens and go through the lower right hand side. Go to the upper left and go up at the next screen. Rest inside the igloo and get the SYRUP BOTTLE and FREEZE CHARM from the chests. Go up to the next area, then get the SYRUP BOTTLE. At the fork, go left, and then go left again, and use R1 in front of the iceberg to melt it and get a LIFE BOTTLE. Go to the upper right and in the next area press R1 again to get a LIFE BOTTLE and SILVER CLOAK, then go to the upper right again and fall down to the bottom. The snow pile has a LENS, then go above and get the SAGE. Go up, melt the iceberg, and get the BATTLE PICK and MIRACLE GEL from the chests. Go through the middle left part and get the SYRUP BOTTLE. Go back one screen, then take the upper left path. Get the TOTO OIL, then go back to where you got the Silver Cloak and take the upper left route. Burn the ice pillar using the Toto Oil and go to the upper right and get the ALL DIVIDE, then go back one screen and go up to face the boss. ========================================================== ------------------------/BOSS FIGHT!/----------/ CELSIUS /---------- HP: 33333 ATTACKS: Ice Needles, Ice Raid, Swallow Dance, Icicle Fall, Mirage, Chi, Freeze Lancer, Blizzard, Frost Shear REWARDS: Resist Ring, Freeze Charm ---------------------------------------------------------------------------- Those sure are a lot of attacks he has, and he can do a lot of damage if you let him pull off those attacks. I died once or twice against him mainly because I did not use fire magic and did not have Reid equippied with the Flamberge. If you equip him with it, and have the others do fire-based attacks, Celsius won't stand a chance. Don't forget to heal, through, especially if Celsius starts to do some of his stronger attacks, like Ice Raid. ========================================================== After the battle, get the LAVENDER, ELIXIR, and HOURGLASS from the chests, then go back to Peruti. ****************************************************************** [------------------------] PERUTI [------------------------] Items: Miacis Badge, Celestia Map, Lens x2========================================================== Enemies: None Bosses: None ****************************************************************** When you return, you will see that the ice has melted and Peruti looks completely different now. Guston will welcome you, saying you are the heroes that saved the town. He'll invite the party for a feast, which of course Reid does not turn down. Guston then asks them, at the feast, to join the Freedom Army. Guston says Balir is in Tinnsia. He'll then give you the Miacis Badge to give to the people in Tinnsia. Now, it's time to feast. At night, Meredy's head will light up, concerning Farah. In the morning, you'll get the Celestia Map. After the scene, go outside of the Inn and to the left, and search the statue near the pond to get the COLD NOODLES RECIPE from the chef. There's two lens in this town, one at the upper left screen tree, and one in a cart of crabs. Buy some items if you wish, then go to the engine room of the Van Eltia to sail to Tinnsia! But first, you'll make a pit stop at Imen. ****************************************************************** [------------------------] IMEN [------------------------] Items: Apple Gel, Lens, Technical Ring========================================================== Enemies: None Bosses: Hydades ****************************************************************** As you enter thw town, you will discover that it has been destroyed. The group wonders out loud who could have done this, and then Meredy will wander off, so you need to go find her. Talk to the man next to the wreckage to buy some stuff if you want, then go to Bupumu to get a Lens in the display case. Go inside the library, to find Hyades, who has destroyed the town! Now, you have to face him. ========================================================== ------------------------/BOSS FIGHT!/-----------/ HYADES /--------- HP: 45,000 ATTACKS: Cursed Roller, Death Finger, Ground Shake REWARDS: Mental Bracelet, Egg ---------------------------------------------------------------------------- At the beginning of the battle, he will do an attack called Cursed Roller, and the damage of it will vary, although it will never do enough to make you worry. There's not too much to worry about with this fight. Just back him away in a corner and perform skills and magic attacks on him. He's strong against all the elements except Light, though. Once he is about to die, he'll do Death Finger, so be wary of that attack. As long as you keep healthy, this battle is no problem. ========================================================== After the battle, there will be a scene, and you will be on the world map. Go back to Imen and talk to the guy at the water pump to get a TECHNICAL RING, then go to the west to get to Tinnsia. ****************************************************************** [------------------------] TINNSIA [------------------------] Items: Lens, Rune Bottle========================================================== Enemies: None Bosses: None ****************************************************************** As you enter the town, Reid will be amazed at all the machinery, and Meredy will reveal that this is the most technologically advanced city in all of Celestia. Go to the house above, and use the moving platform to move upstairs. You will have to do a mini game here. /---------/ MINI GAME /------------------------------/ SUSHI / CONTROLS: Circle - Drink X - Select A Sushi ---------------------------------------------------------------------------- I liked this mini game a lot. You have to eat more expensive sushi than the Man, and the pace of eating will go down as the gauge fills. As the gauge gets more filled, drink to lower the gauge. Yellow Plates are worth 800, Red Plates are worth 300, and White Plates are worth 100. You need more than 4300 points to win. When you win, you will become King of Hunger. /------------------------------------------------------------------------------/ Go to the screen to the right, and search he statue at far right to get a Lens. Go down a screen and search the cat statue to get a BROILED SANDWICH RECIPE from the Wonder Chef. Go to the house above the Ship and talk to Irene. If you have 30 Lens, she'll give you the CELESTI CAPE. Go outside, then right, and go into the gotel. Search the red object to get the SWEET PARFAIT RECIPE from the Wonder Chef. Go outside here, then go all the way right, and someone will stop you from entering the ship, until he sees the Miacis Badge, and then he'll let you in. ****************************************************************** [------------------------] SHILESKA'S HIDEOUT [------------------------] Items: Lens========================================================== Enemies: Shileska G Bosses: None ****************************************************************** Go down the stairs, and you'll have to fight some easy Shileska G's. After beating them, you'll met Ayla, so follow her downstairs. She'll tell you your mission: to go to Balir's Castle. You'll meet Max, who is quite funny. Keele will leave your party, and Max will join your party. Exit the room, enter again, and search the chest for a LENS. Go outside the ship, then left to the next screen. Go into the Van Eltia and go southeast to the Ruins of Volt. ****************************************************************** [------------------------] RUINS OF VOLT [------------------------] Items: Stun Charm, 2x Pine Gel, Big Bag, Pirate's Hat, All-Divide, Panacea Bottle, Thunder Cape, Rune Bottle, Red Sage, Holy Staff, Voltic Sword, Wake Up Charm, Lens========================================================== Enemies: Imp Bell, Madman, Mist, Tallman, Neuroids, Air Slicer, Savage Beast, Venom Bosses: Volt ****************************************************************** Mac will open the door as you enter. Enter the ruins, and avoid the lightning as you move up. It's a trigger trap that reduces your HP each time you get hit. Search the stone tablet to get a Lens. At the fork, go up, and enter the door. This is a very hard room to explain. Basically, you need to accumulate a certain amount of points to open each door. The white door requires 17, the red door requires 15, and 14 points is needed to open the blue door. Each button has a certain point value, so use the buttons to open the doors. First, open the blue door, and get the STUN CHARM. Go through the door to the north, enter the next door, go right, and get the PINE GEL, then go down, and enter the right door. Go up one screen and get the BIG BAG, then go left. Press the bottom here, then go down two screens. Go left and get the ALL-DIVIDE from the chest. Check the shiny object to get the Fuse. Go back one screen, and go all the way east, then down. Take the southwestern door and get the PIRATE'S HAT. Go to the bottom and press L1 in front of the fire, then go all the way back to the room with the buttons and doors. Open the white door now, then go left, up, and right. Press L1 in front of the fire, and insert the fuse to move the platform. Go up the stairs and you will be at a camp scene, will a funny scene involving "Everyone loves Meredy, right?" and Reid saying "I don't partocuarly.." followed by Farah saying "Oh, cmon Reid, Fess up!" Go right three screens, then Max will try to power through here, but can't. Go left three screens, then up two screens. Get the PINE GEL and PANACEA BOTTLE from the chests, then enter the Control Room to the north. Go back one screen, then right two screens. Press the green button, then enter the green doors. Get the THUNDER CAPE, then go up and get the RUNE BOTTLE and RED SAGE. Go north, then go east, and get the HOLY STAFF and the ID Card. Go back to where the buttons are, press the green button again, then the red and blue ones. Get the VOLTIC SWORD from the chest, then go east, getting the WAKE UP CHARM, then go to the control room. Reid will insert the ID Card, then go back to the camp point and go right three screens.  Press the buttons in this order: 1, 2, 3, 4. Enter the door, then follow the path to face the boss, Volt. ========================================================== ------------------------/BOSS FIGHT!/------------/ VOLT /----------- HP: 54321 ATTACKS: Family Reunion, Lightning REWARDS: Holy Symbol, Rune Bottle ---------------------------------------------------------------------------- Ah, the lovely flying boss. Since he is in the air, it's a bit tougher to beat him, as ground-based skills and magic will cause him no damage. Have Reid and Farah do attacks that require them to fly in the air, like Demon Twist, while Meredy does Spread. Heal when neccessary, especially after he does his two main attacks, Family Reunion and/or Lightning. ========================================================== Search the shiny object in the back, and select the slot that Meredy said. Go outside to the world map and go back to Tinnsia, then go to Shileska's Hideout. ****************************************************************** [------------------------] SHILESKA'S HIDEOUT [------------------------] Items: None========================================================== Enemies: None Bosses: None ****************************************************************** Go down the stairs, and watch rthe scene. Max will leave again, and you will get the Craymel Cannon. You'll get a coupon for the hotel, so go there, use the elevator, and choose the Suite. Watch the dream, then go to the girl's room and Meredy will be missing. Go to the rooftop, and Meredy will be here, and Farah will soon follow. In the morning, go to the ship, then you'll have to use the Craymel Cannon to destroy the barrier to get to Balir's Castle. /---------/ MINI GAME /---------------------------/ CRAYMEL CANNON / CONTROLS: Directional Button - Rotate X - Charge, Fire Circle: Press while charging to accelerate. Triangle: Switch View Square: Support Fire ---------------------------------------------------------------------------- You either have to survive until the countdown reaches zero, or defeat the enemy fleet using the cannon. Shoot the cannon when the power gauge reaches MAX. The shield gauge will go down by 1 each time you get hit. Look at the map to target the enemy. /------------------------------------------------------------------------------/ ****************************************************************** [------------------------] BALIR'S CASTLE [------------------------] Items: Pretty Ribbon, Dragon Vein, 2x Elixir, Rare Shield, Scale Robe, Dragger Lance, Lapis Bracelet, Silver Cloak, Silver Plate, Black Onyx, Mythril Arms========================================================== Enemies: Hominicle, Death, Skull Warrior, Guitaricle, Anchor Lizard, Carvadole, Stronghorn, Kubitoom, Clay Golem, Whyte, Fake Bosses: Spiral, Shizel ****************************************************************** When you enter here, watch the scene where Max leaves, then search the barrel for a Lens. Go right and buy some items and weapons if you wish, then enter the castle. Watch the short scene, then go left, through the door. Get the PRETTY RIBBON from the treasure chest, then check the machine to the north of you and choose Yes to press the button on the machine. The monsters that were in the glass cages will come out and the elevator will be activated. Go upstairs, then go right and get the DRAGON VEIN from the chest. Go back to the screen with the monsters and go up the stairs and go right two screens. Go to the upper left door to get an ELIXIR. Go to the other upper left door to get a RARE SHIELD, then go to the upper right hand doors and get the DRAGGER LANCE and SCALE ROBE from the two chests. Go right two screens and you will be at a camp point. Rest here to restore your health if you wish, and amazingly you don't have to watch another lovely camp scene. After resting, go north, through the door. Grab the LAPIS BRACELET from the treasure chest and press L1 using the Freeze Ring to make the barrier move. Press L1 using the Freeze Ring again to make the barrier move. Get the white card, then go down two screens, then north two screens. Get the SILVER CLOAK, then go south and west. Go through the door in the upper left hand side, then get the ELIXIR from the chest. Go down, get the SILVER PLATE, go right, and fight the boss. ========================================================== ------------------------/BOSS FIGHT!/------------/ SPIRAL /--------- HP: 45,000 ATTACKS: Vertical Spin REWARDS: Faerie Ring, Orange Gel ---------------------------------------------------------------------------- He also comes along with four Escargot, and as is my usual RPG boss advice when fighting a boss with smaller enemies, defeat the smaller enemies first to get them out of your way. The less damage you can cause to yourself, the better. Especially since Spiral isn't even that bad of a boss. Just use your strongest skills, like Demon Twist, to win easily. He floats in the air, but even that won't be much of a problem. He only has one attack, Vertical Spin, and that doesn't do too much damage. ========================================================== After fighting this pretty easy boss, go down, then go west. Grab the BLACK ONYX from the chest, then go back to the previous screen. Go east for two screens and check the panel in the upper right hand corner. Remember that white card you got earlier? You'll get to use it now. I know, I'm excited about it just as much as you are. =) Go to the teleporter on the upper left hand corner and you will end up back at the camp point. Rest if you wish, then shoot the red crystal by pushing R1 using the Sorcerer's Ring. The door will open, so enter it and go north two screens. Get the Lens from the chest, then go north. Check the machine to the north and the code will be automatically inputed for you. Go back to the camp point, then go west four screens. Shoot the red crystal by pushing R1 using the Sorcerer's Ring, then the door will open. Go through the door, then go up the stairs. Grab the MYTHRIL ARMS from the chest, then go up the stairs. Enter the door, then check the computer. The code will be automatically inputed for you. Go downstairs to where you shot the crystal and go east two screens. Proceed through the middle door. Watch the scene and prepare to face the boss. ========================================================== ------------------------/BOSS FIGHT!/------------/ SHIZEL /--------- HP: 120,000 ATTACKS: Eternal Finality, Prism Sword REWARDS: None ---------------------------------------------------------------------------- There's no way to defeat this boss, as she'll pretty much kill you with Eternal Finality alone, so just let her kill you. ========================================================== Shizel will try to kill you, but somehow you will survive. Go to Luishka and you'll learn here that Shizel is Meredy's mom, and Balir is Meredy's father. Go visit Galenos and watch the long scene. Go back to Shileska's Hideout now. Watch some more scene and then force Max to join your party by talking to him. Talk to the man where there is a Craymel Cannon and tell him "Yes" to receive the Plasma Cannon. If you have 40 Lens, go talk to Irene to get the Extreme. Max will learn Air Blade once you go back to the Van Eltia. Now go to the Seyfert Shrine, south of Peruti. ****************************************************************** [------------------------] SEYFERT SHRINE [------------------------] Items: Lens========================================================== Enemies: None Bosses: None ****************************************************************** The light bulb to the right has a Lens, so make sure to pick it up, then watch the scene as you get into the Shrine. Reid will try to get in, and after a long scene, you will be in the Trial Room. The messenger of Seyfert will talk to you. He'll ask you why you want the Aurora Arte. Go inside the circle and you will be transformed into a monster! Go down two screens and you will see three dead eggbears. Defeat the Egg Trader, who will drop the egg as he runs away. Go left, then go down to the next screen, and you'll have to fight Reid and Keele. Let them win. Watch the scene and you will learn Aurora Wall. Now, go to Chat's Hut, south of Luishka. ****************************************************************** [------------------------] CHAT'S HUT [------------------------] Items: GPS========================================================== Enemies: None Bosses: None ****************************************************************** The only reason to come here is to get the GPS. Now you can track down a bunch of secret areas using coordinates. Go to my locations list in the bottom of the guide if you want some secret areas to find, otherwise, go to (204,98) to Aifread's Cavern. ****************************************************************** [------------------------] AIFREAD'S CAVERN [------------------------] Items: Flame Sword, Hourglass========================================================== Enemies: Dragoontooth, Fake, Lamia, Seaspin, Spirit, Toriton Bosses: None ****************************************************************** Watch the short scene between the four party members and get the FLAME SWORD from the chest. Then, check the crate to get a LENS. Go to the upper left corner and go through the opening to the next room. Spin the wheel, you have to go 44 squares ahead to win. Once you do so, go north and check the statue, and the door will open. Check the anchor to get a LENS, then enter the door. The ship will be remodeled now, so get the HOURGLASS from the machine in the upper right then enter Van Eltia. ****************************************************************** [------------------------] REMODELED VAN ELTIA [------------------------] Items: None========================================================== Enemies: None Bosses: None ****************************************************************** There are two lens here. One is in the barrel in the screen you are in. Go down three screens and go up the left stairs. You see the submarine Chat is looking at? Check it for another LENS. Check the statue at the top and you will get to control the Van Eltia. Go underwater and go to GPS (35, 14) to get to Jini. ****************************************************************** [------------------------] JINI [------------------------] Items: Celesea Map, Light Crystal, Rune Bottle========================================================== Enemies: None Bosses: None ****************************************************************** You will see something shiny on the ground, so pick it up for 10 Jini. Go into the Inn and check the second floor of the Inn to get a RUNE BOTTLE, then go outside on the world map and wait for it to become night. Once it does, re-enter Jini, as most of the places in this town are only open at night. Buy the Celesea Map in the shop next to the Inn for 10,000 Gald. In the entrance, check the flower to get the Light Crystal. The house below the Inn is the Casino & Exchange. The slot machine has a LENS for the taking, and the gaming machine in the upper left corner has the HOT POT RECIPE from the Wonder Chef. Go out of here, and go to the far right to get to the Auction Hall. In the upper right hand corner, get the LENS, then check the picture in the upper left corner to get the CHILI POTATO RECIPE from the Wonder Chef. Go to the house next to the Auction Hall and check the frog for the HOT CURRY RECIPE from the Wonder Chef. Go next store to the Dance Hall and check the upper right hand corner for a LENS. Now, go to (5, 12) GPS to get to Shadow Cave. ****************************************************************** [------------------------] SHADOW CAVE [------------------------] Items: 765 Gald, Drain Charm, Flare Arms, Holy Circlet, Saint Halberd, Scale Robe========================================================== Enemies: Cuttlebone, Dark Disaster, Dragontooth, Fire Flyer, Grave Keeper, Hunger Blood, Mega Death, Metallicore Bosses: Shadow ****************************************************************** As you enter, Reid will get a little cold, and will be made fun of for it. Heh heh. There's no random battles in here, as you can see all the enemies in here, ala Grandia. Go downstairs and get the 765 GALD, then go down one screen. Get the DRAIN CHARM from the upper left corner and then go down the ladder to the next area. Go to the right and get the HOLY CIRCLET, then go downstairs and to the right to get the FLARE ARMS. Go back one screen and go downstairs to the left. Go down one screen, then get the SCALE ROBE along the way as you keep going down. Follow the path until you get to the Load Crystal. Save here, and note there will be random battles here now. Go down to the right ladder and enter the cave. At the fork, go through both rooms one at a time and kill the enemies to make the cave darker. Go back to the room with the Load Crystal, and go down the left ladder. Enter the cave, and enter both paths to kill the enemies. The road to the upper right has a LENS, so get it and enter the middle cave. Shadow will attack your party. ========================================================== ------------------------/BOSS FIGHT!/------------/ SHADOW /-------- HP: 100324 ATTACKS: Shadow Thrust, Summon Demon REWARDS: Force Ring, Rune Bottle ---------------------------------------------------------------------------- He comes with 2 Empty Dolls, but unlike mostly any other strategy I will give you, don't waste your time trying to kill them. They have almost as many HP as Shadow does, and they can heal themselves for 3,000 hit points whenever they want. So, just focus your attacks on Shadow. He likes to use regular attacks, but his skills are annoying, especially Shadow Thrust, which will do a lot of damage. Have Reid come equipped with the Excalibur and keep doing the Demon Twist skill for an easier win. ========================================================== Shadow will then realize that you are not the enemy. Go back to the Van Eltia and go to Tinnsia to get the KRONA SYMBOL from Irene if you have 50 Lens. If not, why weren't you paying attention? =) There's a pink object near the gnome statue here which will teach Max the Aqua Spiral skill. Go to Luishka Station and he'll ask you to get his ticket puncher at Imen Station. Go there, and he'll say the location in Melenics. Go to the Library in Imen and choose the following order: 1, 1, 3, 1, 3, 2. Keele will search the Bonsai in the library and you'll get the Ticket Puncher. Go back to Luiskha Station and he'll give you a Sephira. Now, go to all the hideouts to get the Silver Cages: (56, 112), (152, 164), (167, 112), (228, 41), (3, 151), then go to (98, 92) to get to Aifread's Platform. ****************************************************************** [------------------------] AIFREAD'S PLATFORM [------------------------] Items: None========================================================== Enemies: None Bosses: None ****************************************************************** Check the middle panel to get a LENS, then put all the Silver Cage in their places. The machine will start to work. Go abck to the surface and go to GPS (100, 92). Press square and choose Enter Relay Point. You will be back in Inferia. Go to (100, 92). Choose Inverse Dome and Conversion Dock. Search the statue here. Go back, choose Inferia Port and Inferia. Now, go to (88, 64) to get to Aifread's Tomb. ****************************************************************** [------------------------] AIFREAD'S TOMB [------------------------] Items: 13579 Gald, All-Divide, Captain's Hat, Elixir x2, Lens, Light Sphere, Losagna's Dress, Moon Robe, Mythril Bracelet x2, Red Bellebane, Red Savory, Star Shield========================================================== Enemies: Bullfrog, Fake, Fungus, Horse Knight, Medusa, Mega Death, Metallicore, Poison Toad, Revenant, Seapsin, Spirit, Spirillum, Super Star, Storm Claw Bosses: None ****************************************************************** Go down and to the left door. Keele woill start whining about the poor design of the room. Go through the left door, and go left, avoiding the four swordmen. In the next room, get the STAR SHIELD and MYTHRIL BRACELET, then go up to the next screen. Here, go to the upper right hand corner to the next area. Move the statue into the wooden object in front of the water. Her head will hit the lamp. Get the RED SAVORY from the chest. Now, go down two screens. Get the LENS from the box in the upper left hand corner. Now, go up one scvreen and right one to get the AIFREAD'S BEARD and CAPTAIN'S HAT. Now, go right and you will be done. Go up across all the bridges, then enter the door. Fall down to the bottom, and avoid the needles as you walk across here. Get the MYTHRIL BRACELET and ALL-DIVIDE, then walk north into the next area. Move quickly, those of you that have played Mega Man know what to expect here with the moving platforms. Get the ELIXIR and GALD from the chests, then move west to the next screen. Talk to one of the statues to restore HP if you wish. Now, go down, and get rid of the fire using the Freeze Ring by pushing L1, then go right, and get AIFREAD'S HAT from the statue. Go back to the room with Aifread's statue and take the door to the right. Follow the path and enter the door. Avoid the swinging pendulums as you walk through here. Get the ELIXIR from the chest after fighting the enemy. Change your party member to a female, and then go left. Fet the RED BELLEBANE from the chest. Go north and enter the door. Follow the path, and get AIFREAD'S CLOTHES from the coffin. Get the chest for a LOSAGNA'S DRESS, then go back to Aifread's statue and check it. His hat, beard, and clothes will be put on him, and the statue will move. Go down the stairs, get the LIGHT SPHERE, and go back to your ship. Go to GPS (34, 4) to get to the Sunken Ship. ****************************************************************** [------------------------] SUNKEN SHIP [------------------------] Items: 10655 Gald, 12245 Gald, 14305 Gald, 15365 Gald, Cute Mitten, Elixir, Insea Map, Rare Plate, Twinkle Flute, Vorpal Sword, Wake Up Charm========================================================== Enemies: Fake, Float Dragon, Kraaken, Seaspin, Super Star, Turnturtle, Tzin Bosses: Siren ****************************************************************** When you enter, watch the scene, then go down and enter the far right path. Go to the door to the north and get the CUTE MITTEN from the chest, then enter the door to the middle and get the ELIXIR from the chest after defeating the Fake. Go through the door to the south to get the BULKHEAD KEY, now go back to the first screen. Enter the door all the way west and enter the door to the north and get the TWINKLE FLUTE, then enter the midlle door and get the WAKE UP CHARM. Now, go back to the first screen again. Go through the door to the middle and use the Bulkhead Key to open the door. Go through to the next screen and get the Pump Room Key. Go back to the first screen, go through the door to the left, go through the door to the south, and use the Pump Room Key on the machine. Go back to where you got the Pump Room Key and head downstairs. Climb the ladder, go north to the next area, and get the RUNE BOTTLE from the chest. Climb the ladder to get the RARE PLATE and INSEA MAP. Go back one screen, climb down the ladder, get the VORPAL SWORD, and enter the door. Save your game and then enter the door to face the boss. ========================================================== ------------------------/BOSS FIGHT!/------------/ SIREN /---------- HP: 52,000 ATTACKS: Trance Symphony, Eating, Yuck, Spread, Air Thrust, Deep Phantom, Holiday Symphony REWARDS: Trident, Sephira ---------------------------------------------------------------------------- This guy comes along with 5 spirits, so take care of them first, because they can get to be annoying if you let them hang around too long. She's weak against fire and lightning magic, and strong against every other kind of magic, so use fire and lightning magic. =) Reid should use his strongest skills. This boss is not that bad, but don't get too close to her at any time, as she has these rocks floating beneath her which can harm you if you touch them. ========================================================== After defeating this boss, get all the Gald from the piches, and go back to the world map and go to Celestia. Go to Chat's Hut. Watch the scene, then go to GPS (120,128) and you will get Pico Revenge. Go back to Chat's Hut and you will see that someone issued a challenge to Chat. She'll want to accept, so go to (204,98) to get to Aifread's Cavern. The answers to the questions, in order: 5, 6, 5, 4, 6, 3, 4, 1, 5, 6. You'll get the Eternal Hammer skill. Now, go back to Inferia and go to Farlos Sanctuary. ****************************************************************** [------------------------] FARLOS SANCTUARY [------------------------] Items: 24424 Gald, Golden Helm, Red Lavender, Spirit Robe========================================================== Enemies: Dinosaur, Ladybug, Mechscoprion, Nocturnal Fly, Stinger Bosses: Maxwell ****************************************************************** Go to Mt. Farlos and go all the way to the top of the mountain. Check the pile of rocks north of the Save Point to get a LENS. Go back to Farlos Sanctuary and enter it. Watch the scene, then enter the ancient shrine. Follow the path to the next screen. Go left and enter the door. Enter another door, then enter the left door to get the 24424 Gald. Go through the door to the right to get the GOLDEN HELM, then go downstairs and you'll see two doors and an exit. The door to the right has a SPIRIT ROBE and the door to the left holds a RED LAVENDER. Take the exit south and enter the door to the right. Save first, then proceed to face the boss. ========================================================== ------------------------/BOSS FIGHT!/----------/ MAXWELL /------- HP: 34,000 ATTACKS: Tractor Beam, Indignation, Cyclone, Stalagmite, Meteor Swarm REWARDS: Faerie Ring, Omni Weapon ---------------------------------------------------------------------------- You can't do all that much damage to him using normal attacks, because he's real strong against them and they will end up only doing 1 damage point. Just pound away with elemental attacks to kill him. He's strong against them, too, but at least you can do more than 1 damage with each elemental attack. He'll go down soon enough, just remember to heal, especially after he does Tractor Beam or Meteor Swarm. ========================================================== Now, leave and go to Inferia City. ****************************************************************** [------------------------] INFERIA CITY [------------------------] Items: Smash Cape========================================================== Enemies: None Bosses: None ****************************************************************** Go up one screen, go left one, and talk to the old man in front of the Arena. He'll ask you if you have a Grip Sword, but you don't, but Farah will offer to find it for him. Accept, then go up one screen, and right one. Talk to the woman in front of Seyfery Sanctuary. She'll say there was a lost item at the Royal Playhouse. Go to the building north of her and talk to the man who's above the stairs. Funny scene occurs, as this man has something he's embarassed to show Farah. hehe. Go outside, and go down one screen. Talk to the first man you originally talked to. He'll say he saw a soldier holding a Grip Sword. You'll get the Sword! Talk to the man and he'll be so happy he'll give you a SMASH CAPE. Now, go to the Seyfert Garden at GPS (166, 18). ****************************************************************** [------------------------] SEYFERT GARDEN [------------------------] Items: None========================================================== Enemies: None Bosses: None ****************************************************************** Watch the scene, and go inside the Projection Room. Go up and enter the door. Go along the path to get to a mirror. Go upstairs and a messenger will appear. Watch the scene with Keele, making sure to run away from battles. Go all the way left and you will see Reid. Go left, down the stairs, and you will be in a tomb. Follow the path to see Reid again. After passing this trial, you will get Aurora Sword. Watch the long scene, then go back to the Port of Inferia. Fight the soldier to get back your ship. Go to Bridge of Expedition and choose Barrier Surface. Go to Seyfert Observatory at GPS (20, 44). ****************************************************************** [------------------------] SEYFERT OBSERVATORY [------------------------] Items: None========================================================== Enemies: None Bosses: None ****************************************************************** Go right, and check the door. Go throgh and follow the trial scene with Meredy. Once you get Shizel, enter the door on the left and defeat the enemies. Shizel will unlock the door. Check the controls besides the glass cage to open the hole. Now, get inside and escape through the hole. You'll be in a sewer, and you will have to face 4 enemies. Go left and go outside the house. Go down to the next screen, and fight some more enemies. You'll get the Aurora Wave once the scene is over. Go back to the elevator and go to Seyfert Observation Room. Get the key, and soon it will be the end of disc 2. |
Categories
2NE1
2PM
action figure
anime
B2ST
Backstreet Boys
Beni
Bi Rain
big bang
Bisnis Semarang
DBSK
emulator
f(x)
home made kazoku
houshin engi
kana nishino
manga
mangaka
psp
Se7en
Seung Ri
SHINee
SNSD
song lyrics
SS501
stuff game
super junior
T.O.P
TaeYang
Tales of Destiny II
tips
video
walkthrough
wallpaper
warriors orochi
Wonder Girls
Recent Post